Expert Support
Mon–Fri, 9AM–6PM EST
Available: Mon–Fri, 9AM–6PM EST
Mon–Fri, 9AM–6PM EST
Available: Mon–Fri, 9AM–6PM EST

A solar panel battery pairing guide is the step-by-step process of matching solar panels, batteries, and inverters so your system stores and delivers power efficiently without damaging any component. Get this wrong and you face faults, wasted energy, or a dead charge controller on day one. Get it right and you have a system that runs reliably for years. The core principle is compatibility across three dimensions: voltage, battery chemistry, and communication protocols. This guide covers how to choose compatible components, wire them safely, compare coupling architectures, and avoid the mistakes that trip up most first-time installers.
Solar battery compatibility is not just about plugging things together. Your panels, charge controller, battery bank, and inverter must all agree on voltage ranges, charging profiles, and data communication. Think of it like a four-way conversation. If one party speaks a different language, the whole system breaks down.
The three components you need to match are:
The biggest misconception homeowners carry into this process is that any battery works with any inverter if the voltage matches. That is not true, and the next section explains exactly why.
Universal compatibility between solar batteries and inverters is a myth. Even devices with matched voltage and identical connectors can fail without compatible firmware and Battery Management System (BMS) communication protocols. This is the single most overlooked factor in DIY solar setups.
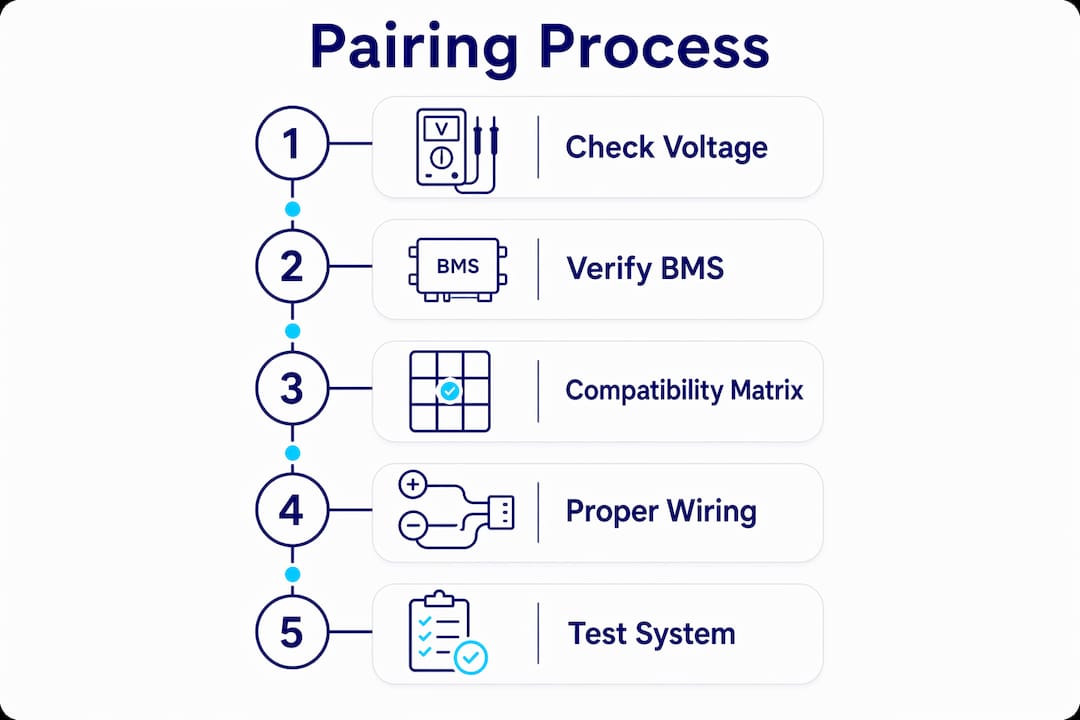
Here is what you need to check before buying anything:
Pro Tip: Before purchasing, download the compatibility matrix from your inverter manufacturer’s website and cross-reference your battery model. This five-minute check prevents weeks of troubleshooting.
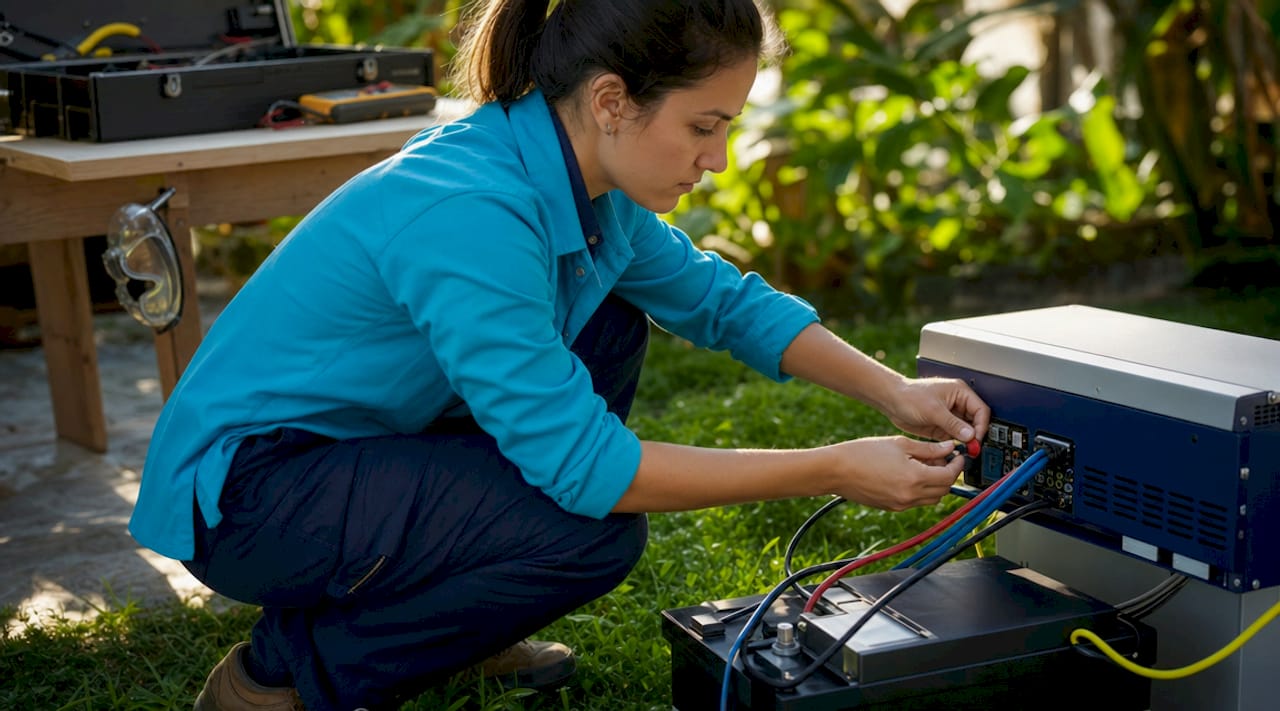
Wiring sequence matters more than most guides admit. The correct order is to connect the battery to the charge controller before you connect the solar panels. The charge controller uses battery voltage to initialize. Connect the panels first and you send unregulated voltage into an uninitialized controller, which often destroys it permanently.
Follow this sequence every time:
Properly sized wiring, fuses, and disconnects protect the system from short circuits and allow safe maintenance. Use DC-rated fuses sized at 1.25 times the maximum expected current, and install the fuse as close to the battery’s positive terminal as possible. Standard AC fuses are not rated for DC arc suppression and should never be substituted.
For panel wiring, series connections increase voltage while keeping current the same. Parallel connections keep voltage the same while adding current. Your MPPT controller’s input voltage window determines which configuration works. Most residential MPPT controllers accept 100V to 450V DC input, so a series string of four 100W panels at 20V each gives you 80V, which falls comfortably within that range.
Pro Tip: Label every wire at both ends before you close up any junction box. A labeled system cuts future troubleshooting time from hours to minutes.
The architecture you choose determines how efficiently your system stores solar energy and how well it handles grid outages. Here is a direct comparison:
| Feature | DC coupling | AC coupling |
|---|---|---|
| Efficiency | Higher. 2 to 3% better round-trip efficiency | Slightly lower due to double conversion |
| Best for | New installations with no existing solar | Retrofitting battery to an existing solar system |
| Equipment needed | Single hybrid inverter with MPPT input | Separate solar inverter plus battery inverter |
| Backup capability | Built-in with a quality hybrid inverter | Depends on battery inverter model |
| Complexity | Simpler wiring, single device | More components, more flexibility |
| Cost | Lower upfront for new builds | Higher for new builds, lower for retrofits |
DC coupling uses a hybrid inverter to charge the battery directly from the panels without converting to AC first. That skipped conversion step is why DC-coupled systems are more efficient. If you are starting from scratch, a hybrid inverter with a built-in MPPT controller is almost always the right call.
AC coupling makes sense when you already have a grid-tie solar inverter installed and want to add battery storage without replacing it. You add a battery inverter alongside the existing system. The trade-off is that solar energy converts from DC to AC through the solar inverter, then back to DC to charge the battery, then back to AC for your loads. Each conversion loses a small percentage of energy.
Hybrid inverters with backup capability allow your system to keep running during grid outages by isolating from utility power automatically. This is a feature worth prioritizing if grid reliability is a concern in your area.
Most solar battery pairing problems fall into a handful of repeatable categories. Knowing them in advance saves you from expensive mistakes.
A note on battery aging: Even two identical batteries purchased at different times can cause parallel imbalance if one has significantly more cycles than the other. If you plan to expand your battery bank later, buy all units at once or use a battery balancer to compensate for cycle differences.
Correct solar panel battery pairing requires voltage alignment, LFP battery chemistry, verified BMS communication protocols, and the right wiring sequence to protect equipment and maximize system efficiency.
| Point | Details |
|---|---|
| Voltage must align | Battery nominal voltage must fall within the inverter’s DC input range to avoid faults. |
| LFP is the best battery chemistry | LFP batteries last 6,000 to 8,000 cycles with lower fire risk than older chemistries. |
| BMS protocols are non-negotiable | CAN or RS485 communication between battery and inverter prevents blind operation and premature failure. |
| Wire in the correct sequence | Always connect battery to charge controller before panels to protect the controller from damage. |
| DC coupling beats AC for new builds | DC-coupled systems are 2 to 3% more efficient and simpler to wire for new installations. |
I have reviewed dozens of solar setups where homeowners bought quality components and still ended up with a system that faulted constantly or underperformed by 20 to 30%. In almost every case, the problem was not the hardware. It was the assumption that good specs equal automatic compatibility.
The detail that catches people most often is the BMS protocol gap. You can have a premium LFP battery and a top-tier hybrid inverter sitting next to each other, and if one speaks CAN and the other only supports RS485 without an adapter, they will never fully cooperate. The inverter will charge the battery, but it will do so blindly, without knowing the real state of charge or temperature. Over time, that blind charging degrades the battery faster than normal use would.
My honest recommendation: before you finalize any component list, pull the compatibility documentation from both the inverter and battery manufacturer. Cross-reference them. If you are buying a complete solar kit where the components are pre-matched, that work is already done for you, which is a real advantage for homeowners who do not want to dig through technical specs.
On the wiring side, the sequence rule is absolute. Battery first, then panels. No exceptions. I have seen controllers destroyed by reversing this order, and the failure is always immediate and irreversible.
Finally, plan your battery sizing around your actual daily consumption, not your peak load. Most homeowners oversize on panels and undersize on storage. A well-sized battery bank that covers your overnight load is worth more than extra panel capacity that produces energy you cannot store.
— Clarissa

Chargeprodirect takes the guesswork out of solar energy storage solutions by matching you with components that are verified to work together. Whether you need a hybrid inverter for a new DC-coupled build or a whole-home battery backup to pair with your existing panels, the catalog is organized around real compatibility, not just specs. The team at Chargeprodirect specializes in helping homeowners avoid pre-installation errors, with free shipping and flexible payment plans on every order. If you want everything pre-matched and ready to install, browse the bundled solar kits that combine panels, batteries, and inverters in one verified package.
Lithium Iron Phosphate (LFP) is the best battery chemistry for home solar systems. LFP batteries last 6,000 to 8,000 cycles, carry lower fire risk than NMC alternatives, and are compatible with most modern hybrid inverters.
Check that the battery’s nominal voltage falls within the inverter’s DC input range, confirm they share a common BMS communication protocol (CAN or RS485), and verify the pairing appears on the manufacturer’s compatibility list.
Connecting panels before the battery sends unregulated voltage into an uninitialized charge controller, which typically destroys the controller permanently. Always connect the battery to the charge controller first.
DC coupling is better for new installations. DC-coupled systems are 2 to 3% more efficient because solar energy charges the battery directly without an extra conversion step. AC coupling is the practical choice only when retrofitting battery storage to an existing grid-tie solar system.
No. Mixing batteries of different ages, capacities, or chemistries in parallel causes uneven current sharing and reduces the lifespan of every battery in the bank. All parallel batteries must be identical models connected with cables of equal length.